💬 How to set up React Native and OneSignal

Here’s a guide on making OneSignal work with React Native and React Native Navigation.
Intro
We all love and the simple and declarative API of React. When React-Native came along it was a game changer. Writing js in the same mindset for two entirely different platforms? Too good to be true? I think not, except for a few cases.
The problem comes when you have to work with packages that touch native code. No matter how well documented these packages are on their own, or how well they abstract away all the java/objective-c code, you’re going to need to get your hands dirty..
The more packages you use, the less chance you will have of finding documentation of how they work together. If you're just using react-native and react-native-navigation you will find a lot of information online. But if you add OneSignal, redux-persist, react-native-config and you also want deep linking then you have to do quite a lot of experimentation to make it work.
Our goals
-
We wanted a one-time popup that asks for the user's permissions after logging in. After either declining or approving this should never appear on the same device unless the app is reinstalled.
-
Also, we wanted to check whether the user disabled the notifications in the meantime, and if so, gently ask for permissions to re-enable them.
-
When the user taps on the notification we wanted to navigate to the given page, leaving the page they were on untouched..
-
A button in the settings screen where the user can see the status of their notifications giving them a way to enable/disable them.
Simple enough, right?
Asking for permission for the first time
OneSignal comes with a pretty good react-native API. By default, right after the user installs the application it prompts for permission. Unfortunately, we needed something different. We wanted to wait for the user to complete log-in and then present them with a customised prompt highlighting the benefits of our notifications.
Here is the first gotcha. There are a few scenarios we need to cover.
- The simplest, when the user installs the app and has never logged in before.
- The app was installed and was used by another user.
- The user was using the device but the app was re-installed.
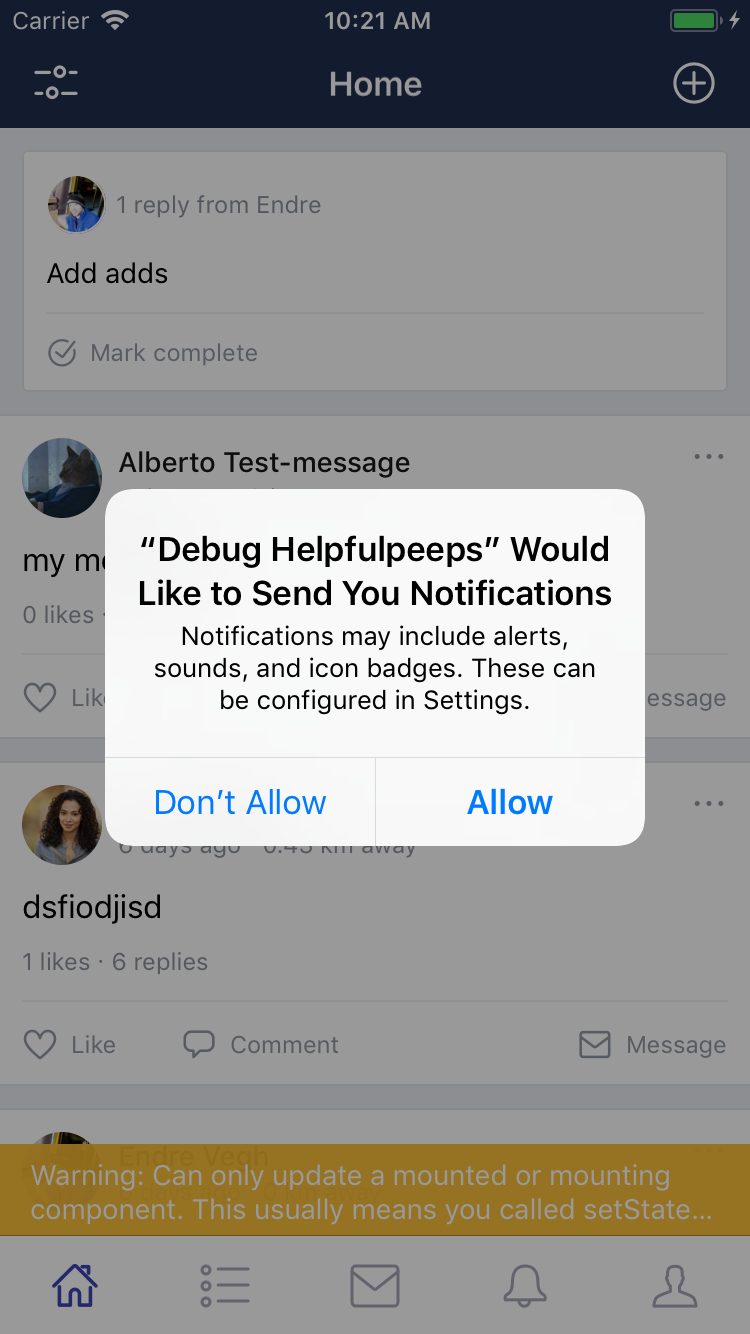
This can create a pretty messy logic but the most important piece is this: OneSignal requests permission on the behalf of the device. Here’s how we worked around this to cater for the above scenarios.

// in render()
<PushModal
  // if the permissions was not asked before show the Modal
  isModalVisible={!this.props.pushPermissionAsked}
  // this action creator switches the pushPermissionAsked
  // state to true
  onDismiss={() => this.props.setPushPermissionAsked()}
  // same happens on accept, but we are invoking the native
  // Modal
  onAccept={() => {
    this.props.setPushPermissionAsked();
    // invoke the native Modal
    OneSignal.registerForPushNotifications();
  }}
/>;

const mapStateToProps = state => {
  return {
    // let us assume that the 'app' state is not whitelisted
    // in redux-persist therefore lost when the app is closed
    pushPermissionAsked: state.app.pushPermissionAsked
  };
};

export default connect(mapStateToProps, { setPushPermissionAsked })(Component);
We don't want to show this modal once it has been asked, no matter what the answer is. So we can utilise redux to store it as a boolean. We need to put it in a part of the redux state that is not persisted to the Asyncstorage because this piece of state is device specific not user specific.
// redux-persist config
// the important bit is that 'app' is not whitelisted
persistStore(
  store,
  {
    storage: AsyncStorage,
    whitelist: ['feed', 'user', 'activity', 'threads', 'notifications']
  },
  () => {
    store.dispatch(boot());
  }
);
This works as expected. However, if we close the app and come back again it asks us again.
This happens because, although the the flag is not tied to the user, it is not persisted to asyncstorage, so gets its initial value (false) every time the app is closed.
If we put in a whitelisted part, it does the trick. We can close the app, and the popup does not show again. However, on logout and login, it still comesback.
const mapStateToProps = state => {
  return {
    // we put the state to the user piece
    pushPermissionAsked: state.user.pushPermissionAsked
  };
};
The issue lies in logout. We are reassigning the state to undefined, avoiding mutation and clearing any sensitive data. But in doing this, we are losing the previously saved data we need
To overcome this we can extend the functionality of our logout handler with a higher order reducer.
const wrapperReducer = (state, action) => {
  if (action.type == 'AUTH_LOGOUT') {
    // get the state before logout
    const { pushPermissionAsked } = state.user;

    // reassign instead of mutation
    state = undefined;

    // before returning the new state, dispatch an
    // action to rewrite the pre logout
    // pushPermissionAsked
    temporaryState = appReducer(temporaryState, {
      type: 'SET_PUSH_PERMISSION_ASKED',
      payload: pushPermissionAsked
    });

    return temporaryState;
  }

  return appReducer(state, action);
};
Now our push notification modal is solid. It only shows for the first user that logged in to a new install.
The important bit is, that on reinstall OneSignal needs to ask for permission again, otherwise the notification setting for the app won't be present in the phone settings. On app update, it does not matter.
What if the user refuses?
When the user accepts our custom Modal and the OneSignal one our job is pretty much done. The hardest part comes when they decline notifications.
OneSignal has an iOS-only API for checking permissions.
OneSignal.checkPermissions(permissions => console.log(permission));Permissions is a js object with three fields: alert, vibrate and badge. We checked the badge. If that is not set, we show a gentle message to the users that their notifications are turned off.
However there is a minor issue here. OneSignal starts to check permissions as soon as the code runs. Bombarding the user with this when our custom Modal barely had the chance to get rendered on the screen is a bit overwhelming.
// OneSignal API check from permission changes
OneSignal.checkPermissions(permissions => {
  // this is a boolean, as soon as we made our own API call which
  // is only after the user granted us permissions
  // then we dispatch setPermissions
  if (this.props.oneSignalLoggedIn)
    // bound action creator that writes the the permissions
    // to redux store
    this.props.setPermissions(permissions);
});
If everything goes well we send an API request to our backend with the OneSignal client side data (more on this a bit later). But the good part is we can set a redux piece of state when the OneSignal login is completed.
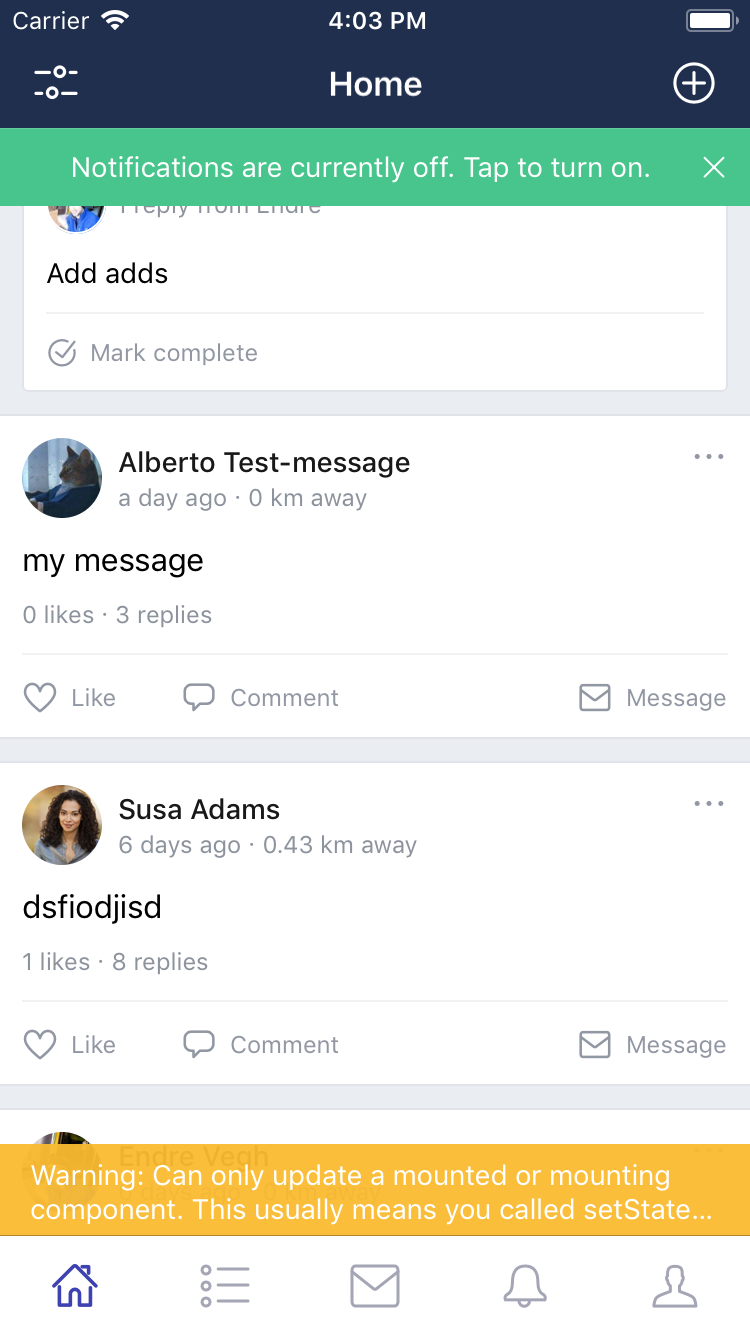
{
  // only show when our Modal has been shown and the
  // notifications are not enabled
  !this.props.areNotificationsEnabled &&
    this.props.pushPermissionAsked &&
    Platform.OS === 'ios' && (
      <Message
        type="success"
        dismissible
        error="Notifications are currently off. Tap to turn on."
        // this RN API navigates away from the app to the
        // settings page
        onPressText={() => Linking.openURL('app-settings:')}
        onDismiss={() =>
          // we are purposefully setting to enabled to silence it
          // on next app open OneSginal check the permissions
          this.props.setPermissions({ alert: 1, badge: 1, sound: 1 })
        }
      />
    );

  const mapStateToProps = state => {
    return {
      // this.props.setPermissions(permissions) in the previous
      // code snippet manages this state
      areNotificationsEnabled: state.app.permission.badge === 1
    };
  };
}
With that in place we can wire up the that little component.
We can only listen to permission changes after OneSignal logs in and it only does that if everything goes well
OneSignal API endpoints
OneSignal on its own is capable of sending messages based on the api key and player id. However we wanted to keep track of our users who log in on multiple devices. So after a normal login we perform a OneSignal login, where we let our API know, that this player_id (that is how OneSignal identifies where to send what) is ready to receive notifications for the given user. We match the device (playerid) and the user (userid). If that is successful than we write a redux boolean to the store.
Adding functionality to turn on/off notifications in the settings page
Having that Modal is all good but the user should be able to turn notifications on/off any time they desire. Also if the user declines our custom Modal in iOS there is no way turn the notifications on in the device's setting if the native Modal was not invoked.
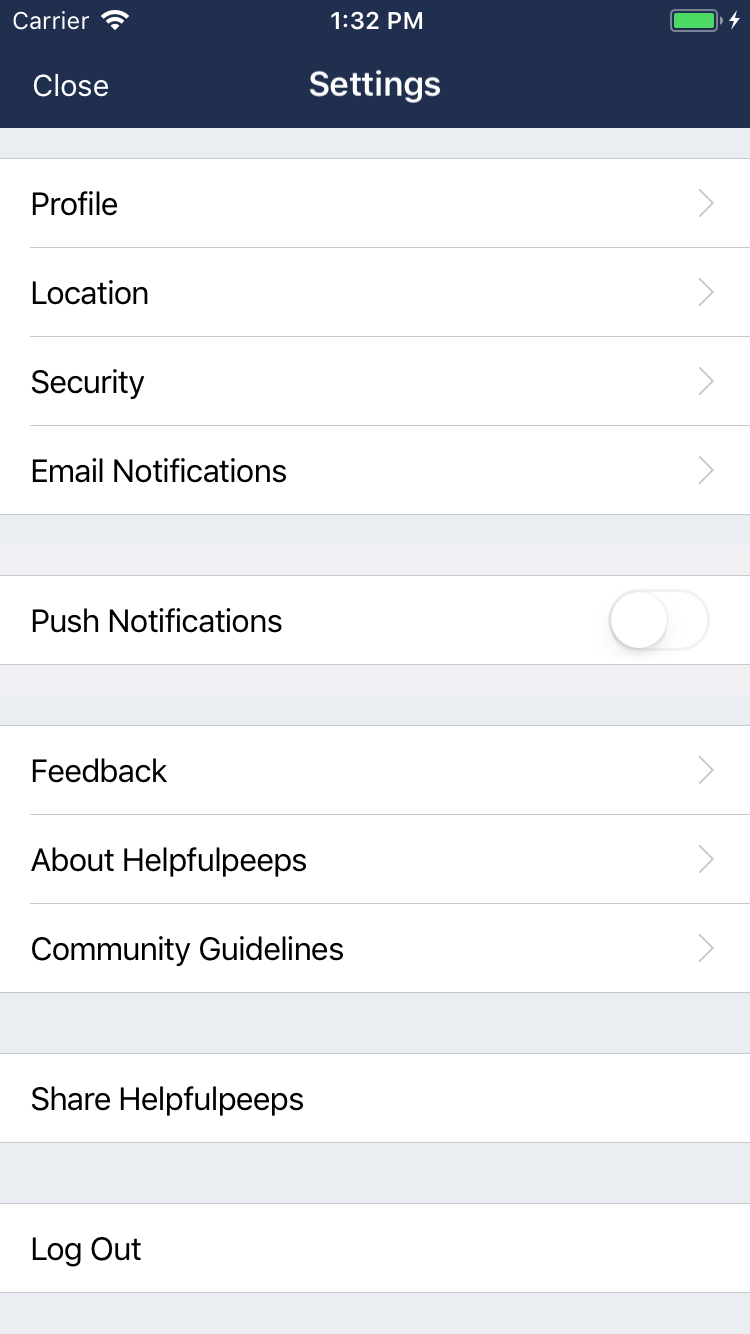
That is the purpose of this pushi notification cell. If OneSignal did not have the chance to open the native Modal it opens it. If it did open it but was declined, then it navigates to the settings. And if everything is fine the cell just does not show up.
class PushNotification extends Component {
  constructor(props) {
    super(props);

    this.state = {
      isNotificationEnabled: false,
      appState: ''
    };
  }

  componentDidMount = () => {
    // make sure everything is fetched on state changes
    AppState.addEventListener('change', this.handleAppStateChange);
  };

  handleAppStateChange = nextAppState => {
    if (
      this.state.appState.match(/inactive|background/) &&
      nextAppState === 'active'
    ) {
      OneSignal.checkPermissions(permissions => {
        this.setState({ isNotificationEnabled: permissions.badge === 1 });
      });
    }

    this.setState({
      appState: nextAppState
    });
  };

  // if OneSignal is not logged in means the native Modal yet
  // not been triggered
  // from here we can set 3 state
  // -1: no native Modal yet
  // 0: Modal triggered, but declined
  // 1: notifications set up
  getStatus = ({ oneSignalLoggedIn }, { isNotificationEnabled }) =>
    !oneSignalLoggedIn ? -1 : !isNotificationEnabled ? 0 : 1;

  getValue = status => (status === 1 ? true : false);

  getFunction = status =>
    status === -1
      ? this.handleOpenOneSignal
      : status === 0 ? this.handleOpenSettings : this.handleOpenSettings;

  // open the native Modal
  handleOpenOneSignal = () => OneSignal.registerForPushNotifications();

  // navigate to the settings page
  handleOpenSettings = () => Linking.openURL('app-settings:');

  render() {
    const status = this.getStatus(this.props, this.state);

    // don't render a thing when everything is ok
    if (status === 1) {
      return null;
    }

    return (
      <Section>
        <Cell
          cellStyle="basic"
          title="Push Notifications"
          accessory="DisclosureIndicator"
          cellAccessoryView={<Switch value={this.getValue(status)} disabled />}
          onPress={this.getFunction(status)}
        />
      </Section>
    );
  }
}
Deep linking
React-native has a number of navigation libraries. Unlike React where react-router pretty much dominates the client side rendering, the situation for RN is not that clear. I don’t know how other libraries work, but the one we are using has a few fundamental differences compared to client side routing, which are all based on the native history api.
In the browser's history you can push and pop pathname to it. Pushing a new route to the top of the stack results in a navigation. It is quite straightforward since you only have one stack.
That can allow us to integrate routing with redux, effectively making a route change an action. Therefore we can use redux-dev-tools time-travelling feature, which is awesome.
But RNN has two basic app types: Single and multi-tab apps. In a multi-tab based app you can have any number of stacks. This means you can push x number of screens (routes) to one tab and can leave the others as they are, unchanged.
The five tabs at the bottom mean we have 5 different navigation stacks in the app.
- Home
- Activity
- Messages
- Notification
- Profile
That is all great but this effectively means if you are on a base tab all the screens are going to be pushed on top..
Nothing is wrong with that as long as we are in control of the routing logic.
In the case of our app, if someone is on the home feed, and wants to comment an a post, the new post screen is going to be pushed on the top of the home feed. You cannot access the home feed unless you pop the comments screen.
Problems come when for some external reason we want to push a screen that belongs to another screen. Imagine we are on the comments screen on the top of the home feed. Then we receive a push notification contaning a new private message. Private messages are naturally invoked from the messages tab but from the home base tab we have no control with traditional navigation.
That is where deep linking comes in. With it we can leave the current stack and push a screen to a new one and navigate to it. Just what we needed.
We can have a push notification which either take us to the Home feed (comments), the Messages (private messages) or Profile (testimonial and Karma received).
However, there are two more things:
- RNN offers 2 ways to push a new screen on the top of the previous one:
pushandshowModal. I don't know how they work internally but for a long time I thought the only difference is in the visuals: push comes from the side, modal from the bottom.
Unfortunately, having a modal open prevents switching from tabs. So when we receive a push notification we need to make sure that on the current tab we dismiss all modals and then navigate to the desired tab and push the appropriate screen there.
- Other problem is there are slight timing issue when the app is in the background in the moment of firing the deeplinking event (tapping on the notification).
Overcoming this I used the solution presented in the community (more on this later)
So let's dive into the deep linking.
Intercepting push notifications
First thing is to make sure we intercept the event when the user taps on the push notification. To do so we declare an event listener in the root of the application.
import { Navigation } from 'react-native-navigation';
import OneSignal from 'react-native-onesignal';
import deepLink from './util/deepLinking';

export default () => {
  // Simply register an eventListener based on the OneSignal API
  OneSignal.addEventListener('opened', onNotificationOpened);

  // The util function that is responsible for the navigation
  const onNotificationOpened = item => deepLink(Navigation)(item);

  // Start the app
  Navigation.startTabBasedApp({
    // Here we define everything for the app.
    // This whole function exported and executed in the index.js
  });
};
Let's examine the deepLink function.
export const POSTS = 'posts';
export const USERS = 'users';
export const MESSAGES = 'messages';

const extractRouteInfo = (launchURL, first_name) => {
  // Does the string manipulation
};

// handleDeepLink creates an event that we can listen to in our
// React components
const handleRedirectToMessages = (navigator, id, name = '') =>
  navigator.handleDeepLink({ link: MESSAGES, payload: { id, title: name } });

export default navigation => item => {
  // Extract the data we need from the notification
  const { notification: { payload: { launchURL } } } = item;

  // OneSignal additionData field is very useful when you need
  // some specific info from the API
  const first_name = item.notification.payload.additionalData
    ? item.notification.payload.additionalData.first_name
    : '';

  // Transfrom the info
  const { type, id, name } = extractRouteInfo(launchURL, first_name);

  // Handle the cases and create an RNN event
  // wish we had REasonML pattern matching... :)
  switch (type) {
    case POSTS:
      return handleRedirectToPost(navigation, id);
    case USERS:
      return handleRedirectToUsers(navigation, id);
    case MESSAGES:
      return handleRedirectToMessages(navigation, id, name);
    default:
      return {};
  }
};
What is happening here? We need the navigation and the item. Navigation will create an event from the OneSignal onopened trigger that could be intercepted to something RNN can understand.
Item is simply the notification and all the data attached to it. It has a lot of useless stuff in it (at least useless in this context), we only need to destructure the launchURL which is basically our route. It is completely arbitrary. Just a contract (interface) between the backend and frontend. In our case we have agreed upon this format:
// hlp://posts/43y74384
// hlp://users/r567567565
// hlp://messages/dfggdfgd
We have the protocol, the type of notification and the id of the notifiaction. All we have to do is extract this information, convert it to a RNN event, and later catch it it the five base tabs.
Another thing worth mentioning is besides the fields OneSignal creates we can provide our own. Your backend API can attach optional fields under the additionalData property.
First part of the problem solved. We translated a OneSignal event to a RNN one. Now we need to make the right navigation based on these events.
import { handleDeepLinking } from '../../util/deepLinking';

class Home extends Component {
  onNavigatorEvent(event) {
    handleDeepLinking(
      'Home',
      this.props.navigator,
      event,
      this.props.authUser.id
    )
      .then(() => console.log('navigation done'))
      .catch(error => console.log('something went wrong'));
  }
}
The onNavigatorEvent is passed to React native navigation's setOnNavigatorEvent method. With this, we can listen to event such as DeepLink.
export const handleDeepLinking = (screen, navigator, event, authUserId) => {
  return new Promise((resolve, reject) => {
    if (event.type !== 'DeepLink') reject('Not a DeepLink event.');

    const { link, payload: { title, id } } = event;

    switch (link) {
      case POSTS:
        return handlePostLinking(screen, navigator, id, resolve);
      case MESSAGES:
        return handleMessageLinking(screen, navigator, id, title, resolve);
      case USERS:
        return handleUserLinking(screen, navigator, id, authUserId, resolve);
      default:
        return reject('Not a processable link.');
    }
  });
};

const handleMessageLinking = (screen, navigator, id, title, resolve) => {
  if (screen === 'Messages')
    setTimeout(() => {
      navigator.push(navigateToConversation(title, { id }));
      resolve();
    }, 1);
  else {
    setTimeout(() => {
      navigator.dismissAllModals({ animationType: 'none' });
      navigator.switchToTab({
        tabIndex: 2
      });
      resolve();
    }, 1);
  }
};
Let's ignore the setTimeout and Promise for a bit and concentrate on the logic itself.
We only care if the event is a DeepLink. If it is didAppear or any other RNN specific event we just don't bother. Then we extract the pieces of information we need. (Remember we set this information up when we converted the OneSignal event to a RNN one) . After that based on the link we are navigating the user to the appropriate page.
Almost there. As I mentioned earlier, a modal (navigator.showModal) prevents switching from tabs. So first we have to make sure there is no modal on the current tab. Then we can switch to the desired tab.
Finally, we need to push the correct screen on the newly switched tab.
I think the logic in itself is pretty self explanatory. However, I found a little issue: when I was outside of the app (app is in the background), parts of the navigation did not happen. Unable to find a neater way, I followed this solution, and used setTimeout as a workaround.
Not elegant, but it does its job and ll the navigation works. However, setTimeout make your code async. I wanted it to be predictable in some way, so turned it into a promise.